Processing RTSP Camera Feeds at the Edge
Turn idle camera streams into live views and AI-driven decisions, all on the plant floor
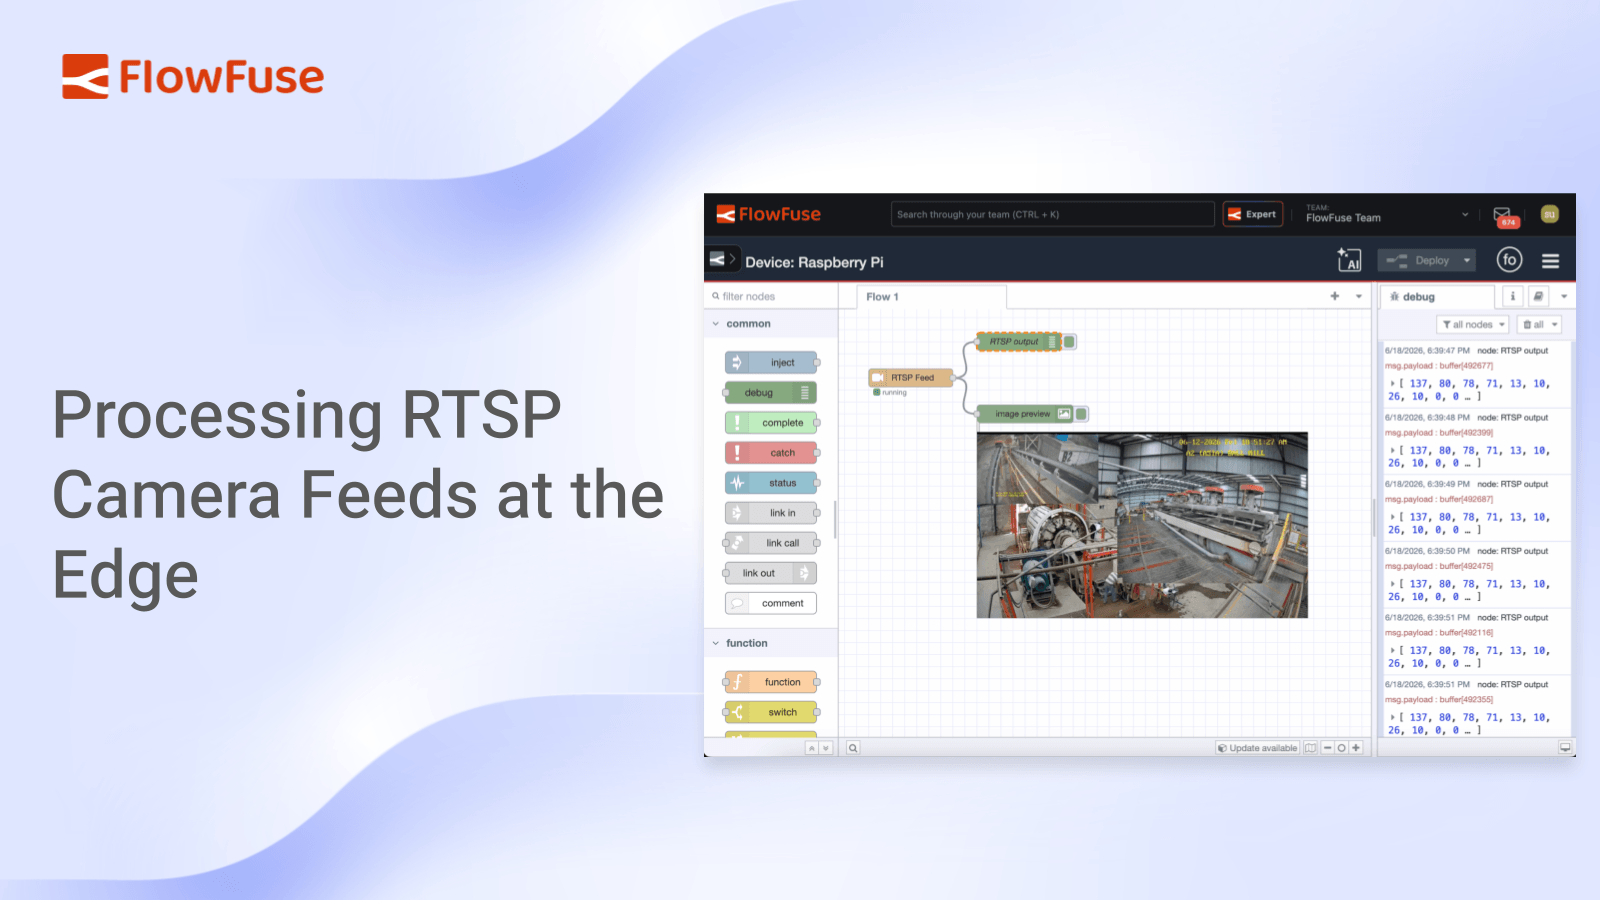
Camera feeds usually sit idle in an NVR. The new RTSP Video Feed node turns an RTSP stream into still frames you can route through your flows, display on a dashboard, or pass to local AI nodes, all at the edge with nothing leaving the plant.
RTSP is the protocol used by most IP cameras to deliver video streams over a network. While these streams are easy to view in an NVR or camera application, they're much harder to integrate into dashboards, automation, or AI workflows.
The RTSP Video Feed certified node published by FlowFuse solves that problem by converting a live RTSP stream into individual image frames that can be processed directly within your flows. Once a frame is available as a message, you can display it on a dashboard, send it to AI models for analysis, trigger actions based on its content, or store it locally.
In this tutorial, you'll connect to an RTSP camera and display the live feed on a dashboard. You'll also see how the captured frames can be passed to local AI models or recorded straight to disk.
Prerequisites
Before you begin, ensure the FlowFuse Device Agent is installed and running on an edge device that can access the camera. This device will be managed through FlowFuse and serves as the environment where you'll install the required nodes and build the flow. If you haven't configured a device yet, complete the Device Agent Quickstart before continuing.
How the node works
The RTSP Video Feed node does one job well: it connects to a camera and pulls still frames out of the stream as PNG images. It drives ffmpeg under the hood, which does the heavy decoding off the main event loop, so even a high frame-rate camera won't bog down your flows.
You give it an RTSP URL, credentials if the camera needs them, and a capture rate. It can then run in one of two modes: emit each frame as a message with the PNG in msg.payload, ready to wire into anything that takes an image, or write a numbered sequence of PNGs straight to disk for plain on-site recording. We'll use the message mode for most of this tutorial, since we want the frames in the flow, and cover disk recording at the end.
Build it: A Live Line View
Let's turn a camera into something an operator can actually monitor—without ever opening the NVR.
Note: The RTSP Video Feed node is a Certified Node available through the FlowFuse Hub Certified Nodes. Contact us if you'd like access or want to learn more.
Installing the node
Enabling the certified nodes package updates the catalogue, but existing devices and hosted instances won't see the new nodes until they restart. Restart any device or hosted instance you plan to install the node on so it picks up the updated catalogue.
- In the FlowFuse editor, open the Palette Manager from the top-right menu.
- Switch to the Install tab and find the "FlowFuse Hub Certified Nodes".
- Locate the
@flowfuse-certified-nodes/rtspand click install.ffmpegis pulled in automatically, so there's nothing else to set up.
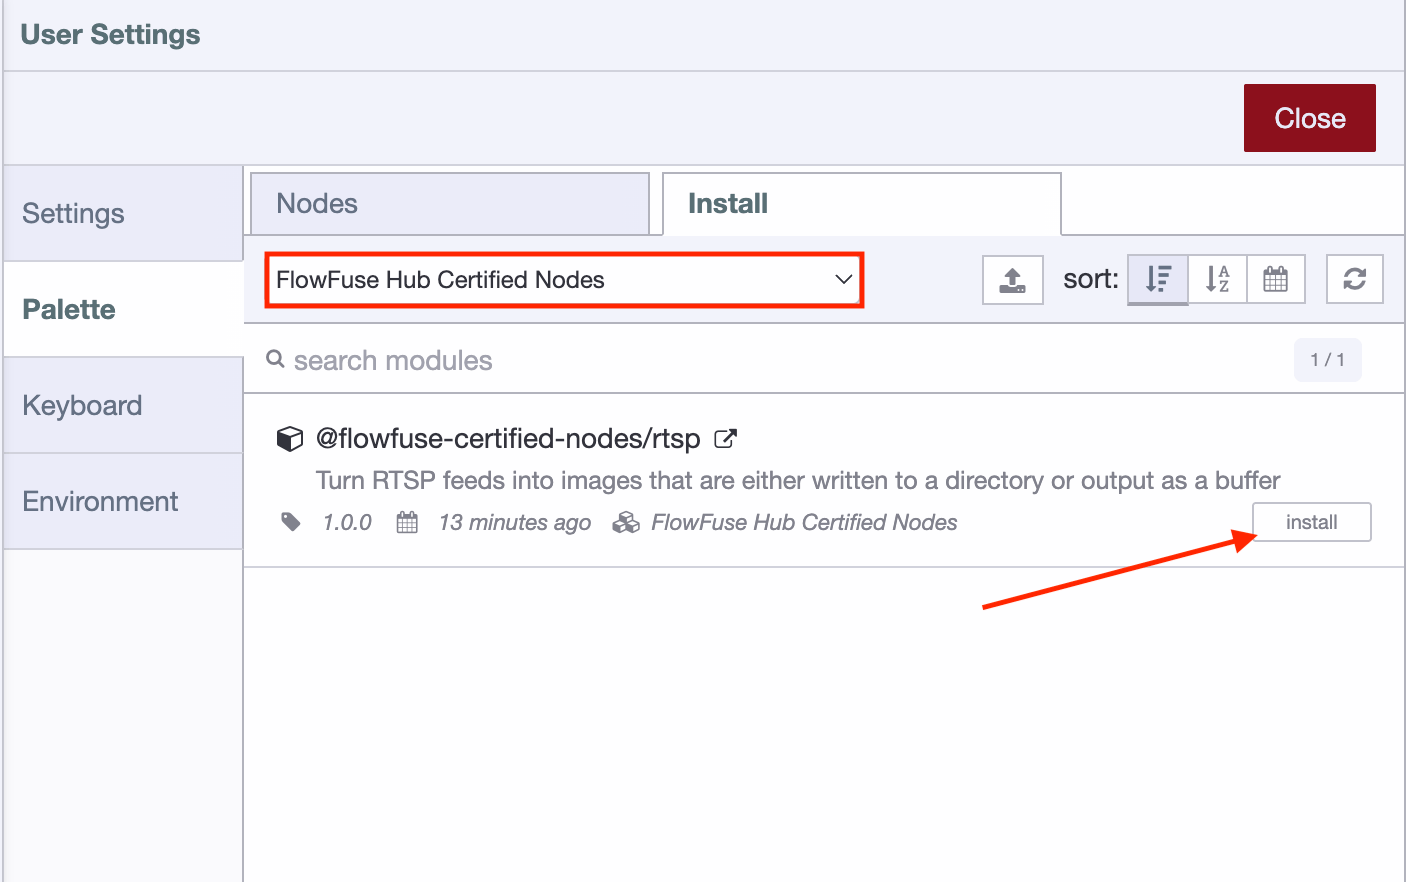
Once it's installed, you'll find the RTSP Feed node in the left palette sidebar, ready to drag onto your canvas.
Configuring the node
- Drag the RTSP Feed node onto your canvas and double-click to open its settings.
- In the RTSP URL field, enter your camera's stream address, for example
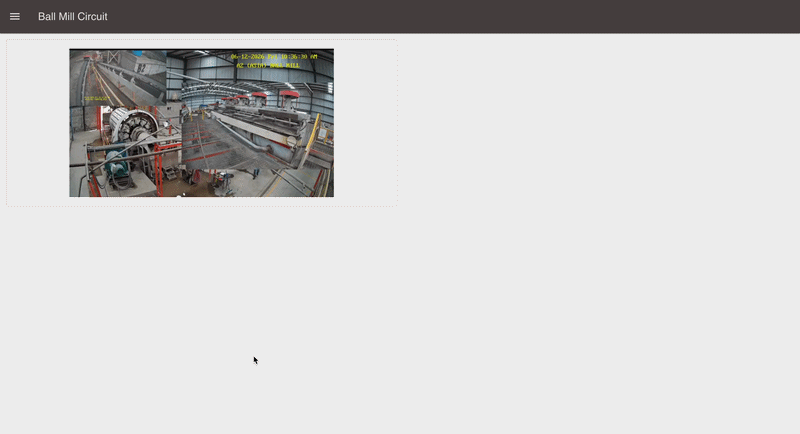
rtsp://192.168.1.50:554/ballmill-a2. - If the camera requires a login, fill in Username and Password. These are stored as credentials and are never written into the flow file.
- Set FPS to 10. Ten frames a second is smooth enough to watch a line in near real time. If your use case doesn't need that, lower it to ease the load: 1 is plenty for periodic monitoring. You can always raise it later.
FPS drives the load. In message mode, every captured frame becomes a message in your flow, so a high FPS means more, larger messages to move and process; keep it no higher than your use case needs. In disk-writing mode no messages are emitted, so the rate instead governs how fast frames pile up on disk.
- Leave Output image as
msg.payloadenabled so each frame is emitted as a message.
You'll also see a File path field. In this mode, the node keeps a single working image in that location, or falls back to the operating system's temporary directory if the field is left blank. You can safely ignore it for now, as it only becomes important in disk-writing mode, covered in Recording frames to disk. In that mode, frames are written to the specified path and are not automatically deleted.
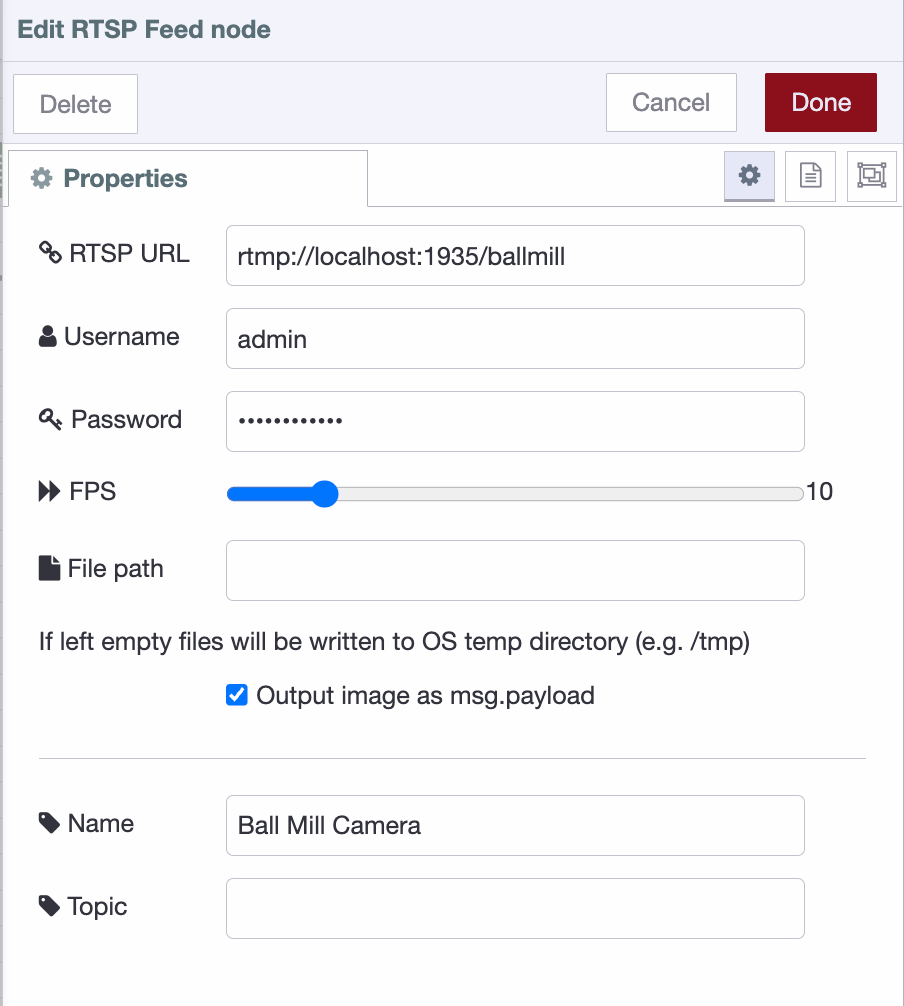
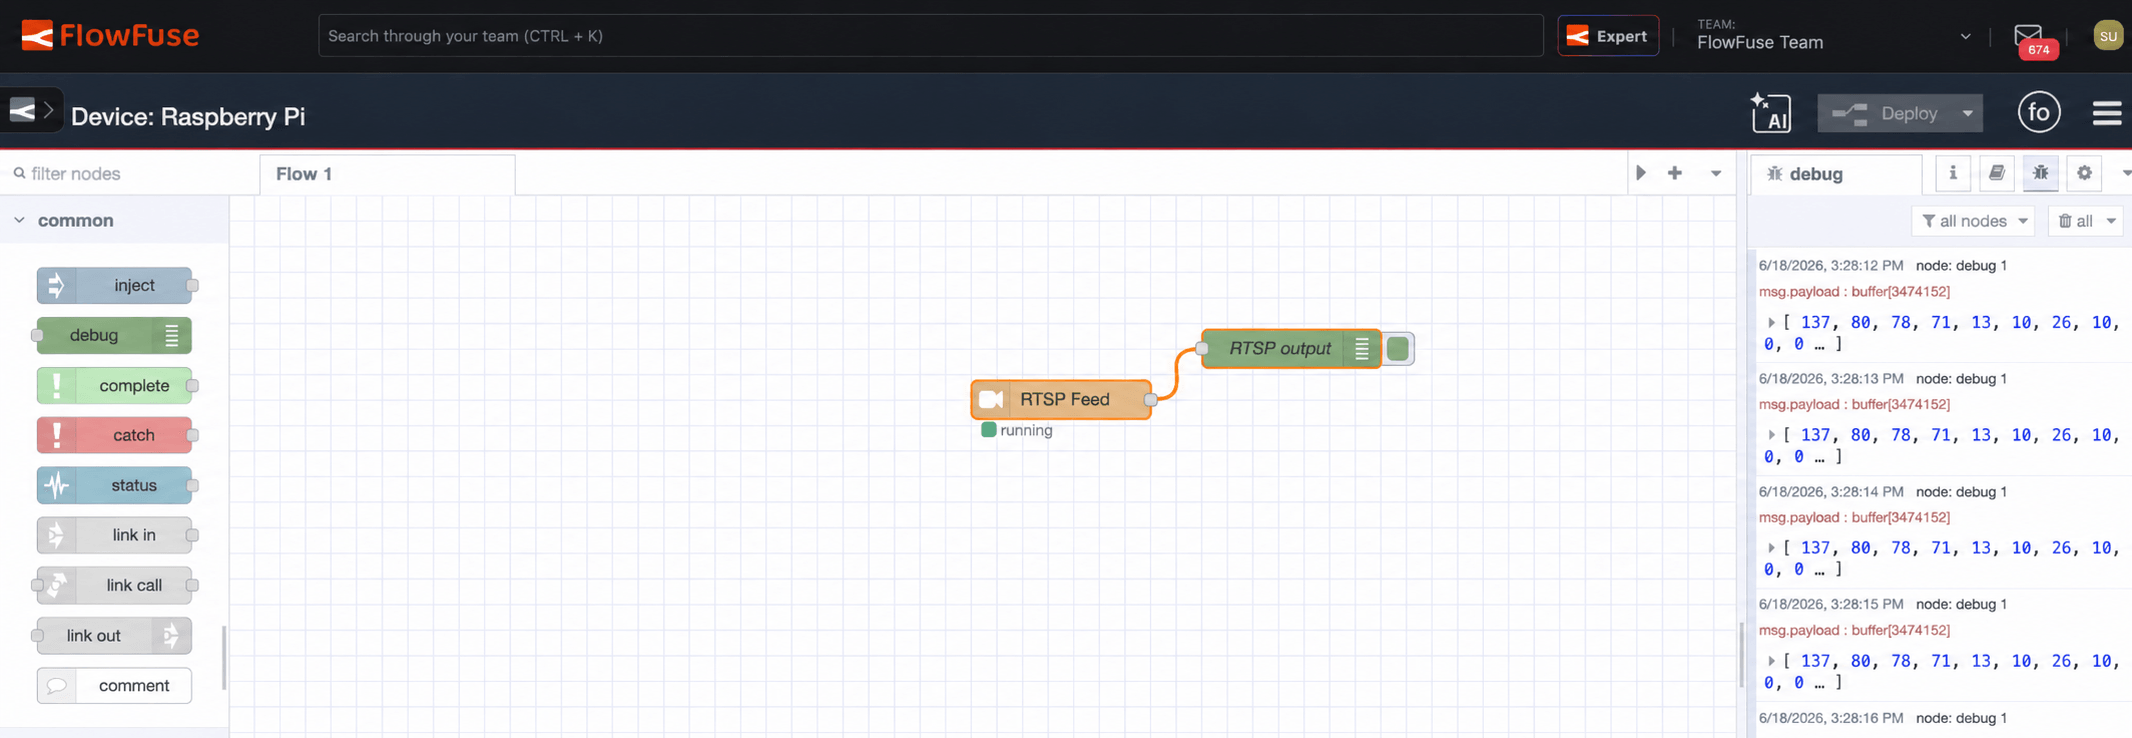
- Click Done, name the node RTSP Feed, wire a debug node to the output, and deploy.
Once the node connects, it shows a green Running status underneath it on the canvas. Capturing begins the moment the flow is deployed, and within a second PNG buffers start arriving in the debug sidebar, confirming the camera is connected and frames are flowing.
Putting the feed on a dashboard
A buffer in the debug sidebar confirms the feed works, but it's no use to an operator. Let's get the frame onto a screen anyone can open in a browser.
This assumes you have FlowFuse Dashboard 2.0 installed. If you don't, follow the Getting Started guide to add it and set up your first page, then come back.
FlowFuse Dashboard has no built-in widget that takes a raw image buffer, so we turn each PNG into a base64 data URI and render it with a standard image tag. The conversion is handled by the base64 node, which you'll need to install: add node-red-node-base64 from the Palette Manager.
-
Add a base64 node after the RTSP Feed node. With its default action, it converts the incoming PNG buffer into a base64 string.
-
Add a Change node after it. The RTSP Video Feed node outputs the image as a Base64-encoded string. To display it in a dashboard image widget, prepend the required Data URI prefix using the following JSONata expression:
"data:image/png;base64," & payload -
Add a ui-template node and assign it to a dashboard group and page. Set its Type to Widget and drop in a single image element bound to the payload:
<template>
  <img
    :src="msg?.payload"
    v-if="msg?.payload"
    style="max-width: 100%; display: block; margin: 0 auto;"
    alt="Live frame from the A2 ball mill camera"
  />
</template> -
Deploy and open your dashboard. If you're working on the edge device, browse to
http://<flowfuse-agent-ip>:<port>/dashboard/, using the IP and port your instance runs on. The view refreshes with every new frame.
That's a live line view anyone can pull up in a browser, with no NVR login and no separate video client.
Watch the message size. FlowFuse Dashboard sends data over a socket connection capped at about 1 MB per message by default, and a full-resolution frame can exceed that. When it does, the message is silently dropped and the image just doesn't appear. If that happens, lower the camera resolution, keep the FPS low, or raise
maxHttpBufferSizein your instance settings.
From a view to a decision
A live view is a real win, but notice what you have now: the camera's output is a PNG buffer moving through your flow, one message per frame. Once a frame is just another message, you can do more than display it. You can ask what's in it.
That's what the FlowFuse AI nodes are for. They run vision models locally, inside your flow, with nothing sent to an outside service. The Object Detection node takes a PNG buffer as its input, which is exactly what the camera node outputs, so you wire the camera straight into it, no conversion step in between. From there the flow stops watching and starts acting: counting material on the conveyor, flagging a person near the flotation cells, or catching a stopped belt before the line backs up. Each detection comes back as structured data, a label, a confidence score, and a position, which you handle like any other signal in FlowFuse.
Recording frames to disk
One last mode worth knowing. Sometimes you don't need frames in the flow at all, just a local record of what the camera saw. Turn off Output image as msg.payload and the node stops emitting messages. Instead ffmpeg writes a continuous numbered sequence of PNGs (rtsp-<node-id>-<counter>.png) straight to disk.
Where they land is set by the File path field. Point it at a directory you control and the frames are written there. Leave it empty and the node falls back to the OS temp directory, typically /tmp. On many modern Linux distributions /tmp is a RAM-backed disk, though not on all, so frames there consume memory rather than disk and are cleared on reboot. Either way it's fine for a quick test but not for anything you need to keep.
Wrapping up
Camera feeds don't have to sit in a silo while the rest of the floor gets connected. With the RTSP Video Feed node, a stream becomes still frames; with a dashboard, those frames become a live view; and with the FlowFuse AI nodes, they become decisions, all at the edge, with nothing leaving the plant.
Bring vision to the edge with FlowFuse
Put your idle camera feeds to work at the edge, from live views to local AI, all without sending video off-site, with FlowFuse
Frequently Asked Questions
About the Author
Sumit Shinde
Technical Writer
Sumit is a Technical Writer at FlowFuse who helps engineers adopt Node-RED for industrial automation projects. He has authored over 100 articles covering industrial protocols (OPC UA, MQTT, Modbus), Unified Namespace architectures, and practical manufacturing solutions. Through his writing, he makes complex industrial concepts accessible, helping teams connect legacy equipment, build real-time dashboards, and implement Industry 4.0 strategies.